Today, we’re excited to share some tips on scheduling emails in Outlook to boost your productivity. With this feature, you can compose emails and schedule them to be sent later, saving you time and ensuring important messages are delivered on time.
During today’s session, we’ll guide you through the process and share real-world scenarios where scheduling emails can be particularly helpful.
Why would you want to schedule emails to be sent?
Time-saving: Scheduling emails to be sent at a later time or date can save you time and prevent you from having to remember to send the email later.
Convenient: Scheduling emails allows you to send them at a time that is convenient for you and your recipient.
Flexibility: You can schedule emails to be sent on weekends, holidays or outside of regular business hours, which is particularly helpful if you work across different time zones.
Avoid mistakes: Scheduling emails can help you avoid sending emails too early, too late, or during inappropriate times.
Optimize email delivery: Scheduling emails can increase the likelihood that your email will be read and responded to promptly, particularly if you need to send emails to recipients in different time zones.
Avoid sending multiple emails: You can schedule all your emails to be sent at once, which can prevent the need to send multiple emails and avoid overwhelming your recipients with too many emails.
Plan ahead: You can create your emails in advance and schedule them to be sent at a later date, which is particularly useful if you are planning a holiday or will be away from your computer for an extended period.
Improved productivity: By scheduling emails in advance, you can focus on other tasks without worrying about sending emails later.
Professional image: Scheduling emails demonstrates that you are organized and efficient with your time, which can help build trust and goodwill between you and your email recipients.
Prevent missed opportunities: Scheduling emails can prevent you from missing important deadlines or opportunities by ensuring that your emails are sent on time and to the right people.
Delaying the delivery of your sent message can be done in a few simple steps:
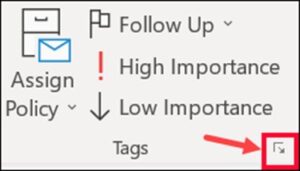
1.While composing a message, select the More options arrow from the Tags group in the Ribbon.

If you don’t see these options, you probably have the simplified ribbon: On the ribbon, select the Options tab, then select the small arrow.
You can also go to the options tab -> select the three buttons on the far-right hand side of the ribbon -> delay delivery.
Lastly, you may have an option under the “options” tab to just select “delay delivery.”


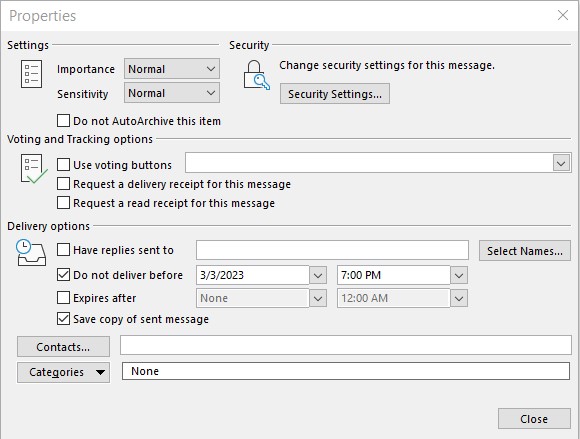
2.Under Delivery options, select the Do not deliver before check box, and then click the delivery date and time you want. Please note that the message will send to the recipient, until a minute after the time you have it set to deliver at. Make sure that the “Save copy of sent message” is selected, to ensure that you have a record of that sent email saved in your “sent” folder.

3.Click close
4.When you’re done composing your email message, select Send
After you click Send, the message remains in the Outbox folder until the delivery time.
Please note:
For Outlook to successfully send the messages as planned, you have to keep your computer logged in and Outlook open to send it.


